search

Tuesday, October 29, 2013

Tips Cara Mengempiskan Perut Tanpa Berdiet Atau Bersukan


Perut besar atau buncit boleh disebabkan tumpukan lemak yang ada di perut atau otot perut yang tidak terlatih. Pelbagai usaha tentu akan anda lakukan untuk mengurangkan tumpukan lemak tersebut, dari mulai diet rendah kalori sampai senam dan bahkan yang paling ekstrim melalui sedot lemak.
Jepun mempunyai cara unik untuk melatih perut supaya tegang dan hasilnya perut boleh mengecil. Caranya hanya dengan meniup nafas kuat-kuat selama 5 saat. Beberapa orang yang melakukannya selama 2 minggu mempunyai hasil yang berbeza-beza, tetapi semuanya berjaya mengecilkan perut.

1. ssediakan sebatang straw

2. Potong straw 5 cm

3. Ratakan salah satu hujung straw

4. Tutup separuh lubang straw dengan salotape

5. Mulut straw setelah ditutup dengan salotape 1/2 bahagian

6. Tarik nafas dalam-dalam dan tiup dengan kuat straw selama 5 saat

7. Lakukan selama 3 minit setiap hari

8. caranya, meniup nafas kuat-kuat selama 5 saat

9. Beberapa orang telah melakukannya selama 2 minggu dan hasilnya berbeza-beza, tetapi semuanya berjaya mengecilkan perut

10. Menurut pakar, saat kita bernafas, otot perut lebih digunakan ketika mengeluarkan nafas daripada menarik nafas

11. Dengan menggunakan straw yang ditutup separuh, kesan penggunaan otot perut semakin meningkat


           SELAMAT MEMCUBA … Hehehehe

Saturday, October 12, 2013

Change wireless Network Password


Change wireless Network Password

(Must connect cable to router)

1. Determine the admin interface for your router and enter it in your browser

Most modern wireless internet routers on the market today are administered via a web browser. You simply need to find out what your wireless router'sadmin interface is and connect to it. You may have written the password down somewhere, if not then you will have to reset your router to its factory default password by resetting the router. This is usually accomplished by holding down the router's reset button for several seconds. Check your wireless router manufactures website or manual for detailed instructions for your specific router.

Most manufactures have a default IP sub net set at the factory. The default sub net will help you determine the router's IP address so that you can connect to it and access the administrator interface. You may need to consult your specific router's manual for the correct address. The following list contains default router IP addresses based on my research and may not be accurate for your specific make or model:

Linksys - 192.168.1.1 or 192.168.0.1
DLink - 192.168.0.1 or 10.0.0.1
Apple - 10.0.1.1
ASUS - 192.168.1.1
Buffalo - 192.168.11.1
Netgear - 192.168.0.1 or 192.168.0.227

In addition to the default router address, you may have to specify the port that the admin interface is running on by placing a ":" at the end of the IP address followed by the admin port number (i.e. :8080) if the manufacturer requires this.

2. Log in to the administrative console on the router

Admin <enter> without password

Wireless setting

Wireless manual network setup

Then change pre share key

save

If you've never changed the default administrator name you can locate the default admin name (and usually the admin password as well)by visiting your router manufacturer's website or by Googling "Default Admin Password" followed by your router's brand name and model.

3. Under the wireless security configuration section, ensure that you are using the latest encryption available

If you haven't already done so you will want to change the wireless encryption from the easily hackable WEP to the much stronger WPA2 encryption. WPA2 is currently the most secure method of wireless encryption available at the time this article was published.

This would also be a good time to change your wireless network name (SSID) if you want. It's best to change it to something other than the default as hackers have precomputed cracking tables for the top 1000 most common SSIDs. Get creative and don't use any dictionary words as SSIDs with dictionary words are more likely to be cracked than an SSID with non-dictionary words..

4. Create a strong password for the Pre Shared Key (wireless network password)

After you have settled on an SSID you will need to enter in the Pre-shared Key (the wireless network password). You'll want to make this password as complex and random as possible to discourage wireless hackers. Follow our guide to creating strong passwords for some best security practices.

It's also a good idea to turn off the "allow admin via wireless" setting off so that only someone connected to the router via an Ethernet cable can administer the routers. If you turn off this feature you remove the ability to connect to the router as an administrator via wireless, which may be a slight hassle, but you gain the piece of mind that no one can mess with the admin settings of your router unless they are physically plugged into it.

After change --- unplug cable out then try use wireless

Step for win 7

Right click wireless sign at bottom right corner

Open sharing network centre

Click manage wireless network

Click your (SSID) name then “Remove”

Then close

For win XP goto wireless network… find show all wireless network

Choose/click yours

Connect… type new password … then

Connect ….

Done

Goto wireless icon then click

All wireless name show – click yours them connect

Enter new password then connect (wait)

Wireless connected ---- End


Second method to change wireless password

Connect cable to router

Goto Tmnetwork … 192.168.0.1

Login admin enter

Wireless setting --------- wireless setup wizard

Your wireless name show then NEXT

Change wireless password to new one … NEXT >>>> Then save…. DONE

Saturday, October 5, 2013

Thursday, October 3, 2013

Why Can't I Watch Videos In Full Screen On Youtube?


What you need to do Right Click Youtube screen.

Adobe flash setting window popup


Uncheck – Enable hardware acceleration.

Then Close

That it’s.


Now try full screen again.


Good Luck

Wednesday, October 2, 2013

How To: Solve your Google Chrome Freezing and Hanging Problems


This problem happens due to the built-in Flash Player which comes pre-installed with your Chrome. It took sometime for me to find the source of the problem but i solved it at last. The Built-in flash player adds a new process known as rundll32.exe. It automatically initiates it and the starting up of rundll32 is what causes the crashes in Chrome.

A temporary solution is to terminate this process and continue working on Chrome. You will not lose any of your tabs. But as this problem will arise the next time you wish to start your Chrome browser, i am providing you with a permanent solution given below.

Step 1: Open a new tab in your Google Chrome browser. Type about:plugins in the address bar and hit enter. Now click the Details buttons to your right to expand every plugin properties.

clip_image002

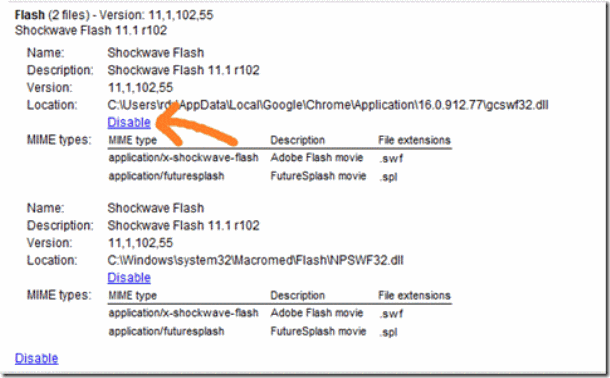
Step 2: Now look for your Flash plugin. There will be two files in it. In the Location field you will see a path address like the one below:

C:\Users\[your-username]\AppData\Local\Google\Chrome\Application\16.0.912.77\gcswf32.dll

This is the file we were looking for. Just click the Disable button below it. Please ignore the NPSWF32.dll file and leave it enabled.

Step 3: Close your tab and restart your browser. Now go to this link http://get.adobe.com/flashplayer/ and install the latest version of Adobe Flash Player.

Step 4: Restart your browser again. Now you will no more have any freezing or crashing problems.

Wasn’t this easy? Apparently the gcswf32.dll was the source of all problems. Till the Google team finds a solution for the built-in flash player, this is the way to stop your Chrome from getting all grumpy on you.

Did you find this article about how to solve your google chrome freezing and hanging problems helpful? Please let us know in the comments.

Tuesday, October 1, 2013

Cara Roots hp Lenovo S890


Kaedah ini saya peroleh melalui laman BukaKotak.com, jadi kredit sepenuhnya kepada penulis laman tersebut. Kudos bro!


Apa yang diperlukan untuk root Lenovo S890?


1. Lenovo Windows Driver
2. Flash Tool
3. TeamWin Recovery Projects (custom recovery) - TWRP for S890 dan Recovery_S890_install.zip (kemaskini versi TWRP untuk Lenovo S890).
4. Fail Root (Superuser) - Root S890
5. Sistem operasi Windows 7 - Ini adalah kerana Windows8/8.1 masih tidak menyokong pemacu (driver) yang diberikan di atas. Maka silalah usaha mencari sesiapa yang ada menggunakan sistem operasi Windows 7, atau format kembali laptop/PC anda (nangis aku..).


Langkah-langkah Root Lenovo S890:


1. Pasangkan fail pemacu terlebih dahulu. Pasangkan ia sehingga selesai.


2. Pada peranti Lenovo anda, buka SettingsDevelopment – tandakan pada USB Debugging.


3. Seterusnya, sambungkan kabel USB pada Lenovo dan hubungkan ia ke komputer anda.


4. Salin Fail Root ke dalam sdcard Lenovo S890 anda. Salin juga fail Recovery_S890_install.zip.


5. Cabut kabel USB dari komputer dan matikan Lenovo S890. Untuk kepastian, tanggalkan baterinya.


6. Ekstrak fail TWRP_for_S890.rar. Ekstrak juga fail Flash Tool dan jalankan fail Flash_tool.exe.


7. Klik pada butang Scatter-loading, halakan kepada folder TWRP dan klik pada fail MT6577_Android_scatter_emmc.txt.

8. Klik pada butang Download dan kemudian Yes.


9. Pasangkan kembali bateri Lenovo anda dan setelah itu sambungkan kabel USB dari komputer ke Lenovo S890.


10. Jika fail-fail pemacu berjaya dipasangkan dengan betul, makan proses flashing akan terus berjalan dengan lancar, dan jika berjaya anda terpapar tetingkap 'Download OK' seperti gambar di bawah:

11. Sila matikan kembali Lenovo anda dan seperti biasa tanggalkan baterinya untuk kepastian.

12. Boot ke dalam TWRP dengan cara menekan butang power, kemudian disusuli dengan menekan butang volume + dan - secara serentak.

13. Terlebih dahulu anda harus mengemaskini TWRP Recovery. Pada TWRP Recovery tekan 'Install' dan pilih external sdcard, kemudian tekan pada file Recovery_S890_install.zip, 'Slide to Flash' lalu biarkan proses berjalan sampai selesai, kemudian pilih Reboot to Recovery.

14. Seperti sebelumnya klik pada Install, pilih external sdcard, cari Fail Root yang telah anda salin ke dalam sdcard sebelum ini dan kemudian Slide to Flash. Setelah itu Reboot System.


15. Tunggu proses boot selesai. Siap! Kini peranti Lenovo S890 anda sudah root dan anda boleh periksa 'kehadiran' superuser dengan menggunakan Root Checker.